Showing posts with label Black Soot. Show all posts

Sunday, 29 June 2014

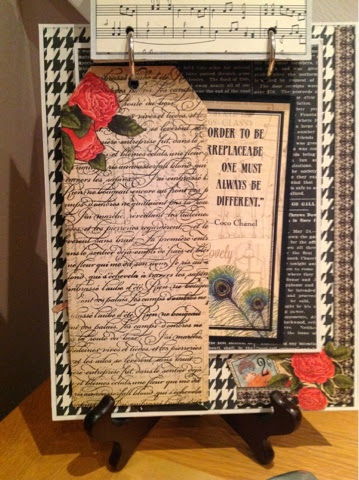
Graphic 45 Meets Stampin' Up!

Hi all.  This week end I have been busy, busy, busy.  First I completed my Mother Goose mini and on Saturday night and today I made another easel mini album.  Although quite simple they still take around 3 hours to make due to all the fussy cutting, layering and assembly.

The background paper is Stampi' Up! and the embellishments are from the 'Couture' collection from Graphic 45.


The frame is cut using my Sizzix Eclips.  The roses are I Am Roses.


All the pages and embellishments have been distressed using Black Soot Distress Ink.


Ever page is constructed from poster board, which is extremely sturdy.


Here I have used the tag top punch and silver ribbon, both from stampin' Up!


This stamp is En Francais from Stampin' Up!, I love this stamp so much.


I still need to attach a Tim Holtz easel to the back so it will stand up alone and I will be embellishing it further will lots of Glossy Accents for sparkle, layers and dimension.

I hope you love this like I do, there are so special to make.

Take care of you.

Pauline x


Sunday, 16 June 2013

Bo Bunny Mini Album and Storage Box


This is a mini album and storage box I have made this weekend using the gorgeous Bo Bunny collection Love Letters.  


The box I made in the shape of a house.  I used tyvek and hot glue to make the structure and also added some strong card hinges both inside and outside.   It's size is 7" x 11" and the mini is 6" x 6", slightly wider once the binding was added.  I used my Cinch from We R Memory Keepers and one of their binders in a gorgeous purple.  Once constructed I used Distress Stain in Tea Dye around all the edges. 


Page 1.  As the collection is Love Letters instead of the traditional shaped pages I chose to make envelopes.  All the pages open up to offer further photo mats and memory keepsake opportunities.


Page 1 & 2.   I used stickers and cut outs throughout all the pages.  On this page I added one of my stash sunflowers because they are sunny and bright. I hot glued the sunflower onto a white peg I also had in my stash. 


Page 2 & 3. On these pages I have added twine, hearts onto tiny pop dots and a small metal frame, which was raised onto sticky foam and will allow a small photo to be placed underneath. 


Page 3 & 4. I distressed a lot of the paper using my Tonic distress tool and using my heart punch I added hearts. 


Page 4 & 5. I think these pages are my favourite. I distressed and layered the paper, used stickers and cut outs, sticky foam for dimension and a decorated cream peg for embellishment. 


Page 5 & 6. These pages were great fun to complete. I used the border from the sticker and adhered it to firm card, added the middle to a page and cut around then layered them onto the border card.  On the next page I used two wood butterflies and wound twine around to secure the flap down. 


Page 6. The final page I used Smoochable paper from my 6x6 stack and a sticker, which to me was most appropriate for the final page. 


Front of house box,  I used I Am Roses and other flowers from my local craft store.  I cut out the lock and key and used sticky foam to raise them to add dimension. A peg from my stack was added for effect. 


Side view.  Its difficult to make out but many of the cut-outs on both the house and throughout the mini album have been raised on sticky foam and foam dots and squares to add dimension and depth.


Side view.  I fussy cut out part of the paper collection to the top and to make a border and made a tag to insert inside and added an eyelet and ribbon. Flowers are from my local craft store.


Back of the house.  I layered three of the bunting cut outs and added a metal butterfly, raised the sentiment onto foam and tied this gorgeous pink twine around. 

This was such a delight to make.  There are so many opportunities to place pictures within the envelopes and also on the back-side.  This collection is so much fun and truly inspirational.

I hope you have enjoyed this project.  

Hope you are all having a wonderful weekend.  Take care of you.

Pauline
x

Saturday, 1 June 2013

ABC Primer post it holder

ABC Primer by Graphic 45 is a gorgeous collection centred around victorian schooling.  The colour are  primary colours, bright and exciting.

For a craft fair today I made some post it holders.


All the pages were inked with Black Soot from the Tim Holtz collection by Ranger.  Sticky glue and pop dots adhere the paper to the card stock.  Post it notes will be added later.

Have a wonderful weekend everyone
Pauline
X


Saturday, 25 May 2013

The Flying Man: A Steampunk Story

The Flying Man from the Steampunk Debutante collection from Graphic 45.
Welcome to another blog and a further page of my Steampunk Debutante mini album using the amazing Graphic 45 paper collection.


                                               Here is the finished page which has wooden elements, mental embellishments and has a 3D effect.


                                                   To start my page I prefer to fold down the edges on all sides.  I use my scoring board and score at 1/2 inch on all sides then snip into the folds to allow the sides to side without added bulk.  I do this with all my pages as I feel this provides additional strength and stability, not just for the present but hopefully in the years to come.


                                                 This is how it looks adhered down.  I tend to do both shorter ends first then the longer ends as I will be having additional photo mats in between the pages and having the seam this way I feel minimises pulling or tearing of the seam and photo mat when putting them in and out.


                                                      I fussy cut the picture of this flying man from the paper and separated him from the hand and blades.  I used black VersaCraft Ink in Real Black on the wooden gears and then added a Graphic 45 brad to the smaller gear and metal button to the larger one.     


                                                                I also fussy cut one of the large butterflies from the paper, cut it in half then adhered it under the button with glue. 


Having fussy cut around the hand and blades I then adhered it under the page and added a platform underneath to raise it off the page.  I used a 3/4 inch piece of black card stock and creased this to create a rectangle before adhering to both the page and the underside of the hand.


                                                           You can see the platform in this picture.  I also fussy cut two more butterflies, applied Glossy Accents to highlight the wings and adhered one to the hand and the other to the smaller gear.  All the cut outs and page were inked with Black Soot Distress Ink for effect.


                                                      I positioned the larger gear onto the man's back to reflect the steampunk butterfly is helping him to fly.  However, he doesn't quite trust this butterfly so he has springs on his feet to bounce just in case!  Raising the hand and blades allowed me to change the use of the blades from part of the mechanics of his flying machine to that of a wind machine to help blow him to help him fly.  I hope it reflects this to you.  


Thanks for dropping by, have a wonderful crafting time and speak to you again soon.
X
Pauline