Sunday 29 June 2014

Graphic 45 Meets Stampin' Up!

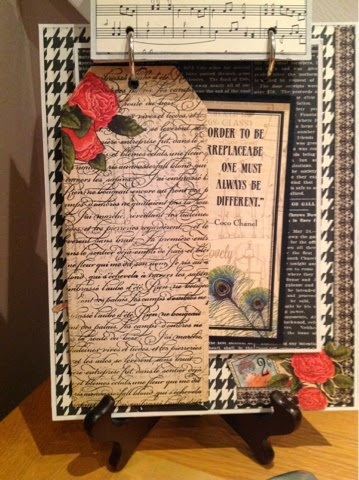
Hi all.  This week end I have been busy, busy, busy.  First I completed my Mother Goose mini and on Saturday night and today I made another easel mini album.  Although quite simple they still take around 3 hours to make due to all the fussy cutting, layering and assembly.

The background paper is Stampi' Up! and the embellishments are from the 'Couture' collection from Graphic 45.


The frame is cut using my Sizzix Eclips.  The roses are I Am Roses.


All the pages and embellishments have been distressed using Black Soot Distress Ink.


Ever page is constructed from poster board, which is extremely sturdy.


Here I have used the tag top punch and silver ribbon, both from stampin' Up!


This stamp is En Francais from Stampin' Up!, I love this stamp so much.


I still need to attach a Tim Holtz easel to the back so it will stand up alone and I will be embellishing it further will lots of Glossy Accents for sparkle, layers and dimension.

I hope you love this like I do, there are so special to make.

Take care of you.

Pauline x


Saturday 28 June 2014

Mother Goose Mini Album and Storage Book

I have 99.9% finished the project.  With only the ribbon ties to add it's almost complete.  Here are some more photos.  Part 1 of this mini can be found        and to see how I completed the book click


I made an envelope and made a small photo book to slip underneath.  The bottom page opens into a flip booklet, which has been decorated with papers from both the 8x8 pad and the 6x6 co-ordination pad.


This is the back page.  I stopped at four pages as I had made so many options for holding photographs within these four pages it was getting very bulky.


Then I started to decorate the book I had already constructed.  The link for how I constructed the book is above.


I love the inside of the box, this paper is so special.


The outside of the book.


The front page has lots of layers and so much fussy cut parts adhered and added, which a 2D photo is hard to pick up.  I used Decopatch on Mother Goose's wing and the dog's tail to strengthen them and also added lots of Glossy Accents for some extra shine.


This photo shows the layers better.

Well I hope you love this wee album as much as I do.  Take care of you.

Pauline x


Friday 27 June 2014

School's Out For Summer!

Well that's all the school's out for summer, and you probably just sang that didn't you?  What are your plans?  I hope you are all remembering to take those photos and get them printed off and get them into albums.  With so many fantastic 'apps' around you can make photos all different sizes to fit all kinds of pages and truly create a wonderful unique and exciting project for your families to be proud of and want to share with everyone.

Stampin' Up! 's collaboration with Becky Higgins and Europe's presentation of our new catalogue is in only 4 days, just a wee reminder for everyone looking to save those precious memories for future generations.  Stampin' Up! has a most astounding collection of Project Life cards, albums, protective pages and gorgeous embellishments all perfectly colour co-ordinated for you to make life even simpler, a must for all us with our busy lives.  The paper co-ordinates with the collections and with the inks and will all come together looking very professional indeed. 

If anyone would like to order any of these products, to have some 1:1 guidance or to have a Hostess Party looking at products I would love to show you our range so please get in touch.  Truly, you won't regret it. 

Here are some pages of a mini album I have made using our 'Everyday Adventure' collection and some other paper collections from Stampin' Up!.

If you would like to check out more photos of this Gold mini click here.


Take care of you.

Pauline x


Mini Album Using Graphic 45 'Mother Goose'.

As you may recall I have been working on a mini album, which I have been making completely from scratch.  It seems likes a long time since I have updated my blog and the reason for this is the Graphic 45 paper I ordered from the USA as there was a considerable price difference so waiting a while longer was worth it.

Part 1 of the project you can find here.

I have started with the mini album and will go back to the storage box later.  Here is what I have completed so far.

Lots of fussy cutting to create layers with the flowers, mini wooden alphas, which I coloured using Real Red from Stampin Up and a mini metal frame I have had in my stash forever haha.  The sentiment I used a Stampin Up oval punch and the gromlets I can't recall who they are from as I have had them also in my stash for such a long time.


Here you can see better the layers.  I also applied Decopatch to the paper as some of the fussy cut parts are very thin and may be easily torn and applying the Decopatch this strenghthens the paper.


All the embelishments have been raised on dimensionals to enable photo to be placed underneath and act similarly as a 'belly band'.


I used a photo corner punch on the photo mat to enable a photo to be placed directly inside with ease.


Again inside this book I have used the photo corner punch on the photo mat.  I will be adding more mini books to enable journalling as this is in my opinion at times more important as you are sharing the story, the feelings and offering insight into what the photos are all about for generations to gone.

This is a flip up page.

This is what I have achieved to date.  I will be adding more very soon.

I hope you are enjoying Wimbeldon and are screaming 'come on Andy' at the tv.  Have a wonderful weekend.  Take care of you.

Pauline x


Sunday 15 June 2014

Story Book Mini Album (Part 1).

Yesterday I was feeling kind of restless and was desparate to have a new project.  I have some paper on order so decided to get started on the construction of what is now my current project.


This is the book cover of what will be the storage for a mini album.  It measures 5 1/2" x 7".  I have used good quality poster board.  First I lay a few lines of adhesive to the back of each piece then place it down on a length of cardstock, leaving approx 1" all around.  When placing all the parts together be sure to leave 1/8" or the width of a piece of board you are using to ensure there is sufficient space for it to close.


I then made 'the box' which will go inside.  I have adhered the hinges already in this picture.  I use kraft cardstock for its strength.  Cut 1" strips then using a scoring board score at 1/2" the entire length.  Using a strong double sided 1/2" tape place two strip down the length you need, in this case 6 7/8" (x2) and 5 3/8" (x2).  Remove one side of tape and adhere onto the box, beware not to go farther than the middle score line, adhere just before ensuring their will be space to adhere to the outside covers of the album.


This is how it looks once closed.


I then painted all the edges using black gesso.


Then changed my mind, I wanted it white!


I then cut out using my trusted craft knife and steel rule 6 chipboard pieces measuring 6 1/4" x 5 3/8" and then rounded the corners.


I then punched a hole in the centre to enable a metal ring to be used to clasp them all together once finished and painted them white too.


This is as far as I have gotten so far.  Come back soon to see more progress as it's made.  

One word of warning......the paper I have ordered for this album is coming from the USA and may take a wee while so it will likely be some days before my next post on this album.

I hope you are all having a wonderful weekend.  Take care of you.

Pauline x


Thursday 12 June 2014

Project Life Is Here Today!


At last Project Life by Stampin' Up! is here.  Stampin' Up! in partnership with Becky Higgins, creator of Project Life is offering an exclusive range of scrapbooking and journaling products, which is made for busy people who still want to record and take photos and can now do so using this simple system of cards, page protectors, embellishment packs and lots of fun.   

As you will know as a demonstrator I have been able to order some of these products early and have had the most amazing fun creating wonderful memories for my youngest to keep, enjoy and share with his family for many years to come.  Making memories is what we do with our children all the time and Stampin' Up! and Becky Higgins just made doing so even better.

The new Stampin' Up! 2014 Annual Catalogue becomes available on 1st July and this will include more Project Life products, which includes journaling card, accessory sets for every possible theme and family event including weddings, babies, children, and travelling.  However, you too can now get your hands on a starter set to enable you to sample Stampin' Up! Very own Project Life.
  • Photo page protectors - a pack of 12" x 12" pocket pages in a variety of layouts, but each with standard pocket sizes of 6x4 and 3x4.  No cutting, scissors or glue required!
  • Pre-printed designer journaling cards - can be used portrait or landscape and are double-sided so you can create 2 pages at the same time if you want to.  They also come in a wonderful handy box that can be used to keep your cards, journaling pens and accessories all together.  
  • Corner punch - you can leave your cards and photos square, or round them using the punch - it's entirely up to you
  • Journalling pens - a pair of pens to capture your thoughts, notes and memories as you go - and lots more besides!
Additionally you can purchase:
  • Accessory Pack - lots of stickers and co-ordinating embellishments to enable you to add a little something to your basic journaling layouts.
  • Stamps - sets of photopolymer stamps that include days and dates and lots of useful shapes and icons to bring your pages to life.
  • Framelits - a set of framelits to enable you to quickly and easily crop both photos, cards and labels in super-quick time.
 The Project Life system works well for everyone young and old, novice or experienced scrapbooker and you are sure to get great results in a super quick time or spend longer creating detailed layouts embellishing to your hearts content with the accessory packs and any other items from the Stampin' Up! range.  As you know Stampin' Up! take time to ensure everything coordinates beautifully making it dimple and easy for you to create beautiful works of art.
I am so excited and would love to share my Project Life projects with you. 

I have already posted a blog post, here and have many photos on my Facebook page here. If you want to order now please click on the links below and they will take you directly to my online store.   Please do not hesitate to get in touch if you think you may need some support to get going and know I would love to help and share my own experiences of a Project a Life with you.

Project Life by Stampin' Up! Products Now Available to Purchase - just click on the photo to go to my online store:


Table built using Product Table Builder by The Crafty Owl - Independent Stampin' Up! Demonstrator.